
How to organize pantry on a tight budget starts with one honest idea: you’re not “bad at organizing,” you’re just working with a small space, mixed packaging, and groceries that don’t stack neatly.
If your pantry feels like a black hole where snacks disappear and expired cans multiply, the cost isn’t only annoyance, it’s wasted food, duplicate purchases, and those last-minute grocery runs that add up fast.
This guide keeps it practical: what to keep, what to ditch, how to set up zones that actually stay organized, and which “organizing tools” are worth paying for versus what you can repurpose for free.
What makes pantries feel messy (and expensive)
A pantry gets chaotic for a few predictable reasons, and none of them require a “perfect” home to fix.
- Too many categories sharing one shelf: baking items sliding into snacks, snacks hiding spices, and suddenly nothing has a home.
- Packaging that won’t stack: bags, boxes, and half-opened items create dead space and collapse into piles.
- No visibility: if you can’t see it, you rebuy it, then you’re organizing doubles.
- Mismatch between how you shop and how you store: bulk buys need different “parking spots” than weekly groceries.
There’s also a quiet money leak: the items you forget until they expire. According to USDA, food waste is a significant issue in the U.S., so building visibility and rotation into your pantry setup matters for your budget as much as your sanity.
A quick self-check: what kind of pantry do you have?
Before you buy bins, decide what you’re solving. Pick the closest match, then follow the matching fixes later.
- “I can’t find anything” pantry: visibility problem, needs zones and labels.
- “Stuff falls out” pantry: access problem, needs shelf-friendly containment and better shelf height use.
- “I keep buying duplicates” pantry: inventory problem, needs a simple restock rule and front-to-back rotation.
- “I have tiny shelves” pantry: space-shaping problem, needs risers, turntables, or door/wall add-ons.
Also note what you cook most weeks. A pantry organized around your real meals stays tidy longer than one organized around aspirational ingredients.
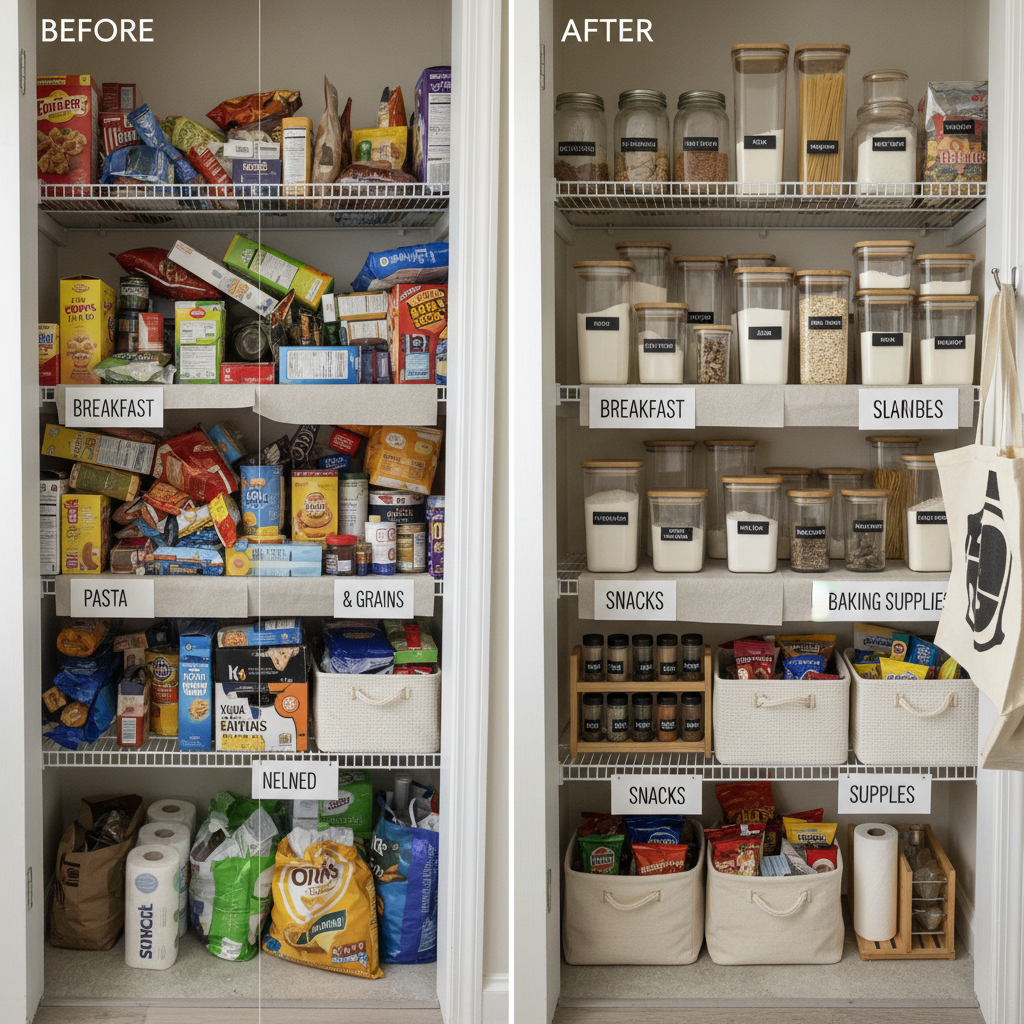
The budget method: empty, sort, zone, contain, label
If you want how to organize pantry on a tight budget to stick, you need a repeatable system, not a weekend makeover that slowly collapses.
1) Empty in “shelf batches,” not all at once
Many people stall because the kitchen becomes unusable. Clear one shelf at a time, wipe it, then reload it with intention. Fast wins keep momentum.
2) Sort into simple, realistic groups
- Breakfast
- Snacks
- Canned and jarred goods
- Pasta, rice, grains
- Baking
- Spices and cooking oils
- Backstock (extras)
3) Build zones based on “reach”
- Eye level: daily-use items you want to grab without thinking.
- Lower shelves: heavier items like canned goods, flour, small appliances if stored in pantry.
- Top shelves: backstock, party supplies, rarely used items.
4) Contain only what benefits from containment
Containment isn’t about making everything match, it’s about preventing small items from drifting and stopping bags from toppling. If you skip this step entirely, the zones blur again.
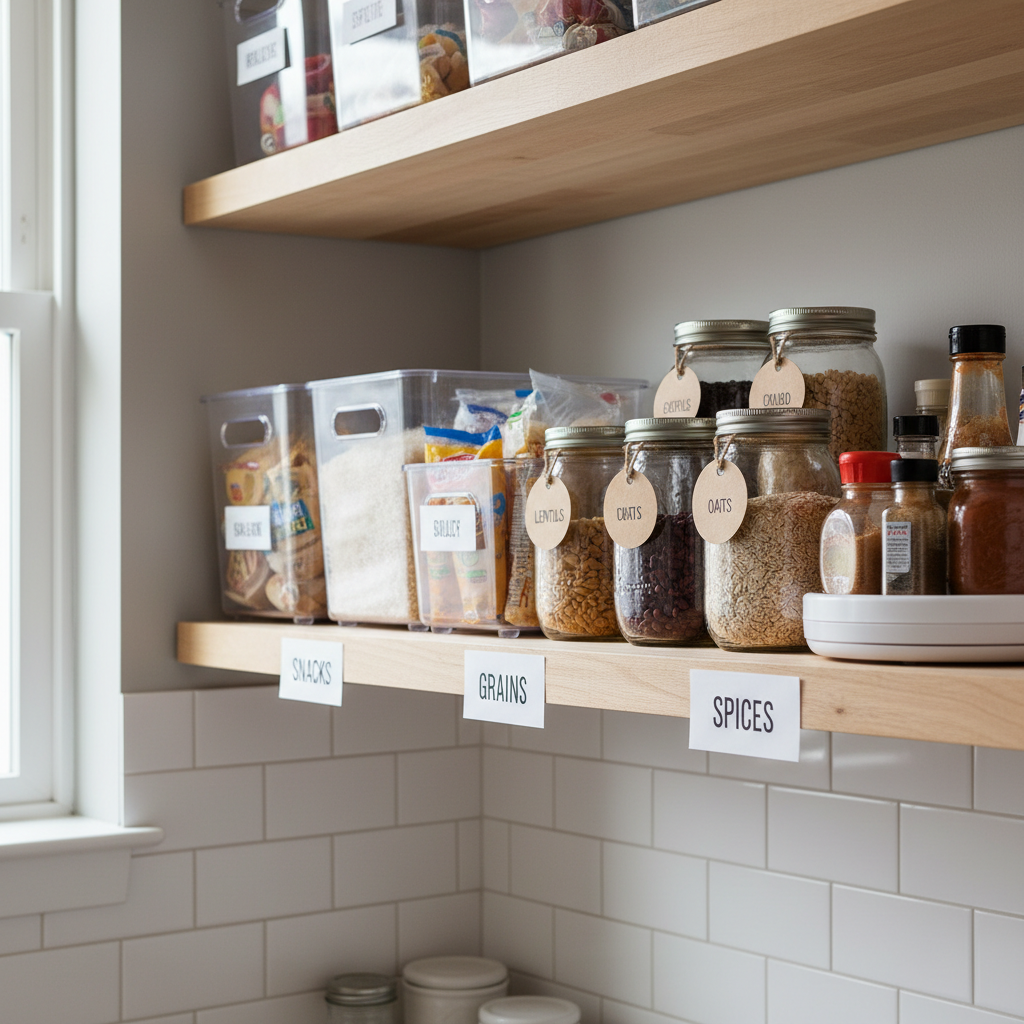
What to buy vs. what to reuse (a realistic budget table)
You don’t need a full set of matching containers. Buy the pieces that solve a specific problem, then fill the rest with repurposed options.
| Need | Buy (low-cost) | Reuse (free/cheap) | Why it’s worth it |
|---|---|---|---|
| Stop small items from wandering | 2–4 medium bins | Shoeboxes, small baskets | Keeps categories together, faster resets |
| Use deep shelves better | Lazy Susan/turntable | Cake stand base (stable), tray | Prevents “lost in the back” bottles |
| Create extra levels | One shelf riser | Sturdy boxes turned sideways | Improves visibility for cans/jars |
| Keep open bags from spilling | Clips or airtight containers | Binder clips, jars you already own | Reduces staleness and pests risk |
| Make it maintainable | Label tape/marker | Masking tape + pen | Anyone can put things back correctly |
If you’re choosing where to spend, prioritize: one turntable for awkward bottles, a few bins for snacks and packets, and labels. Everything else can be improvised for a while.
Step-by-step pantry setup that stays organized
This is the part most guides gloss over: the “maintenance friction.” A pantry looks organized when it’s easy to put away groceries on a tired Tuesday night.
Step 1: Create a “landing zone” shelf
Pick one shelf for whatever you buy weekly. That shelf becomes your autopilot. Many households do well with snacks + breakfast at kid height, but your reality may differ.
Step 2: Set a backstock boundary
Backstock is where budgets go to die if it spreads. Give it one bin or one top shelf section, no more. When it overflows, that’s your signal to stop stocking up and start using up.
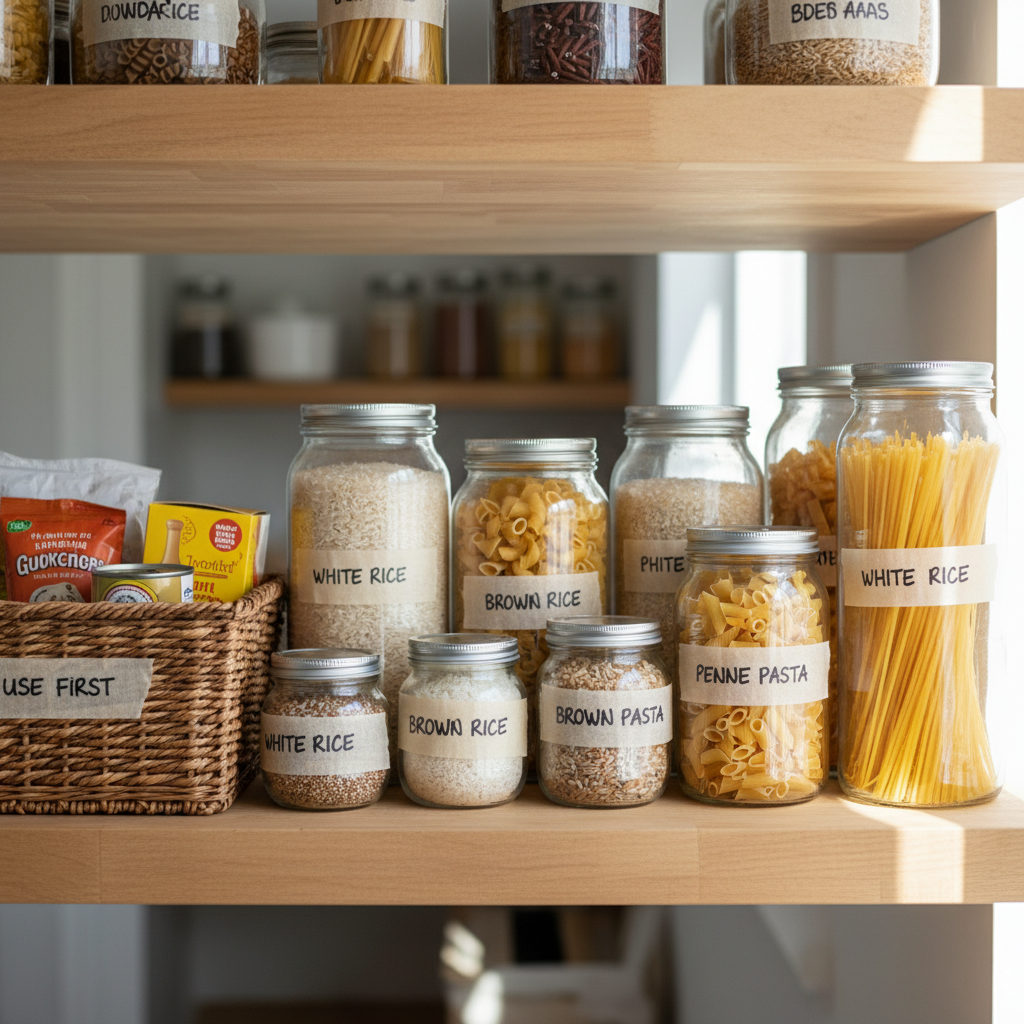
Step 3: Use “front stock” rules for waste control
- New groceries go behind older items.
- Anything expiring soon comes forward, ideally in a small “use first” basket.
According to FDA, date labels can be confusing, and many are about quality, not safety. If you’re unsure about an item, it’s smarter to check the manufacturer guidance and use common sense, or consult a professional when safety feels unclear.
Step 4: Decant only your high-volume staples
Decanting means transferring food to another container. It looks nice, but on a tight budget it should be selective: rice, pasta, flour, sugar, cereal, and maybe snacks you buy often. Everything else can stay in original packaging inside a bin.
Money-saving habits that make the organization pay off
The cheapest pantry system is the one that prevents re-buying what you already own. These habits take minutes, not a full reset.
- One-minute weekly scan: glance at snacks, breakfast, and “use first,” then write a tiny list.
- Shop your pantry first: plan one or two meals around what’s already open.
- Keep a running inventory light: not a spreadsheet, just a note on your phone for backstock like rice, pasta, canned tomatoes.
- Capsule snack rule: if snacks overflow the snack bin, no new snack variety until it shrinks.
When people ask how to organize pantry on a tight budget, they often expect a shopping list of containers. The bigger win is reducing friction so your household stops “reorganizing” by accident every time someone cooks.
Common mistakes (that look good on Pinterest but fail at home)
- Buying containers before measuring shelves: even a half-inch mismatch turns into wasted space and frustration.
- Over-decanting: too many containers to refill becomes a chore, then the system quits on you.
- Categories that are too specific: “chips,” “crackers,” “granola bars,” “cookies” can be one “snacks” bin if space is tight.
- No plan for tall items: cereal boxes, paper towel packs, or appliances need a defined spot or they’ll block everything.
- Labels that don’t match household language: if your family says “ramen,” don’t label it “soups.”
Also, if pests are part of the problem, focus on airtight storage for risk items and keeping shelves clean. For persistent issues, it may be worth contacting a local pest control professional for advice appropriate to your home and area.
Key takeaways (keep this simple)
- Zones beat perfection: a few clear categories prevent clutter from spreading.
- Buy only problem-solvers: turntable, a handful of bins, labels.
- Backstock needs a boundary: one bin or one shelf section.
- Rotation saves money: older items forward, new items behind.
- Maintenance should feel easy: if putting groceries away is annoying, the system won’t hold.
Conclusion: a tight-budget pantry can still feel calm
If you want how to organize pantry on a tight budget to be more than a one-time cleanout, build a pantry you can maintain when life is busy. Start with one shelf, create two or three zones you use daily, and add just enough containment to keep items from migrating.
Your next move can be small: set up a “use first” spot today, then choose one budget tool this week, either a bin or a turntable. That’s usually enough to feel the difference fast.